An inexpensive telescope ideal for all situations?
Would you like to observe Saturn and its rings, the crater-riddled Moon or the majestic Orion Nebula by eye through a telescope? Choosing your first telescope for visual observation can be a real headache, given the variety of products on offer. Do you need a high-tech electronic mount or a simple manual telescope? A small, portable instrument or a photon "cannon"? In this article, we'll take a look at the type of telescope you'll need to get started in visual sky observation. On the menu: the famous Dobson (a.k.a. "the beginner's best friend"), alt-azimuth vs. equatorial mounts, an overview of other optical formulas (to find out what you're missing out on), and more. or not), and a few useful tips to make the most of your evenings under the stars. Ready to point your telescope at infinity? Let's get started!
Contents
The Dobson telescope: simplicity and large diameter - What is a Dobson? Why is it so popular for observation? Advantages and disadvantages of this "photon bucket".
Alt-az versus equatorial mount - Understand the differences between frames for visual observation and why the Dobson (alt-az) lends itself well to visuals.
Overview of other types of telescopes - A brief comparison of current optical formulas (Newton on frame, Schmidt-Cassegrain, Maksutov, eyeglasses) to situate the Dobson in relation to its "competitors".
Practical tips for getting started - Tips for use, mistakes to avoid (including the obsession with magnification), basic maintenance and possible evolutions for a visual beginner.
The Dobson telescope: simplicity and large diameter
If you've ever browsed astro forums or asked for advice in a store, you've probably been told "Take a Dobson. But what exactly are we talking about? The DobsonIt's a type of telescope with a philosophy that couldn't be simpler: fit the maximum accessible diameter on the simplest possible frame. And if you've read the article on the basics of optics, you know that's exactly what you need to do in visuals!
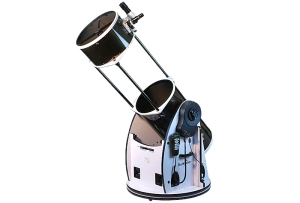
In practical terms, a Dobson is a telescope Newton (with mirrors) mounted on a base alt-azimutale often made of wood or plastic, that swivels up and down and left and right. Imagine a large optical tube set in a sort of rotating box on the floor: that's a Dobson. No tripod or complex equatorial mount, no electronics required (except for motorized "GoTo" versions) - just a big mirror, two manual rotation axes, and your eyes to guide the thing. Well, and a viewfinder for finding objects.
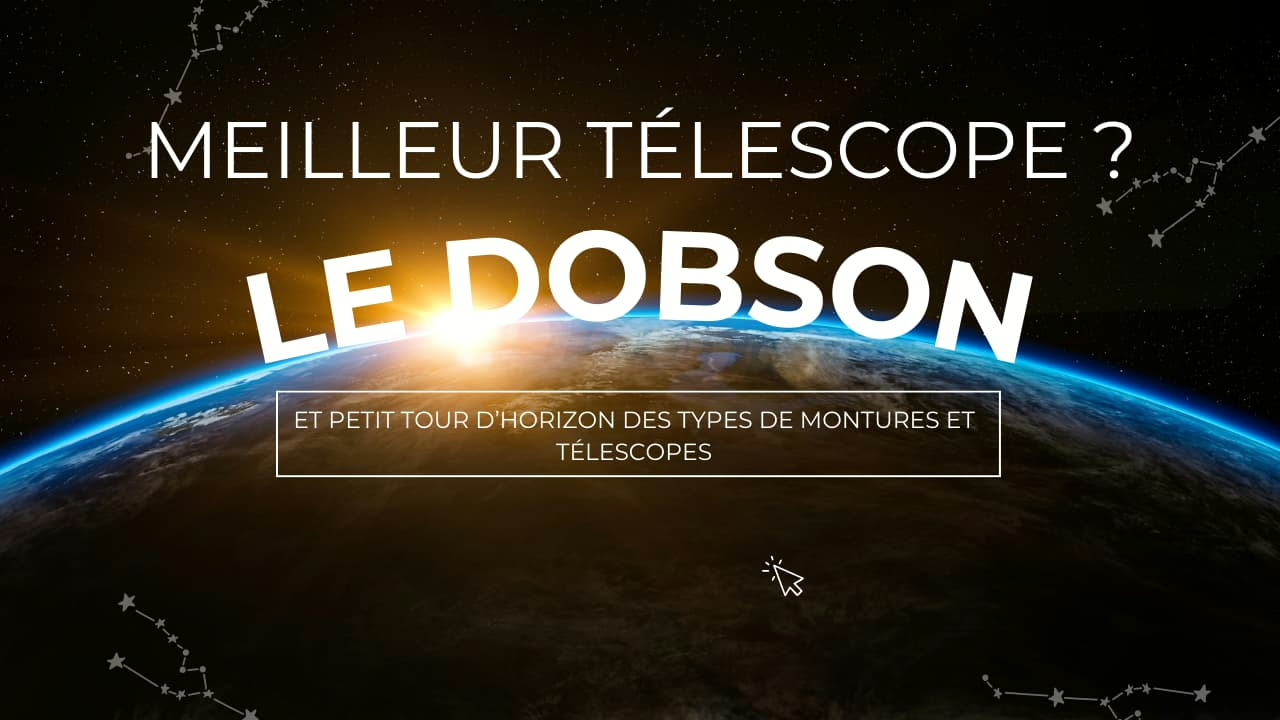
Figure 1 - Typically a dobson locksmith (because it's not made of solid tube, but has rods to hold the structures together. This has the advantage of reducing weight and improving transportability, since it can be dismantled). You can find exactly this telescope in our store.
Why has this formula won over beginners and experienced observers alike?
Because it offers best diameter/price ratio on the market. Instead of spending hundreds of francs on a sophisticated frame, invest in the mirror as large as possible. As a result, for a given budget, you can afford a Dobson with a much larger mirror than any other telescope on a complicated mount. And as we've seen, diameter is the key to seeing faint objects. A 200 mm (8") Dobson, for example, often costs less than a 100 mm telescope or a 125 mm catadioptric telescope. This is for the largest diameter.
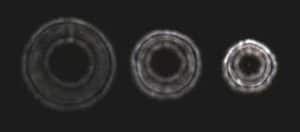
Figure 2 - A 114 mm Dobson table telescope. The optical tube is mounted on a simple wooden base, allowing azimuth (horizontal) and altitude (vertical) rotation. This type of instrument favors simplicity and portability - you place it on a table, turn the tube by hand, and observe! This format is ideal for children, for example!
The perfect instrument for everyone!
Aside from cost, the Dobson shines for its ease of use. There's no complicated set-up: just place the base on the ground (or level it, but that's not even necessary for visual purposes), and point the tube at the desired area of the sky. The movement is intuitive: you push left, right, up, down - a child can do it. This spontaneity makes the Dobson a a formidable discovery tool You scan the sky, come across an object and observe it immediately. Many amateur astronomers tell us that with a Dobson, they've rediscovered the pleasure of "hunting" objects in the sky by instinct, without screens or robotic mounts. It's a great way to learn about the sky.
The limits of dobson
Let's talk about limits of the Dobson. Firstly, as it is non-motorized (for the basic versions), the does not compensate for the Earth's rotation. In other words, the stars will slowly cross the eyepiece field, and you'll have to refocus them periodically by pushing the tube. At low magnification, this isn't a problem at all - you can follow Jupiter at your fingertips - but at high magnification (typically on a planet at 200×) you need to refocus quite frequently. It's a bit of a handful: you observe, push a little, re-observe, and so on. Nothing insurmountable, but you need to know how. Similarly, without motorized tracking, long exposure astrophotography is out of the question with a classic Dobson. It's a telescope designed above all for the visual (I'll come back to this in article 3 on astrophotography).
Another point: a Dobson being a Newton, it requires collimation from time to time. Collimation is the alignment of mirrors. It's not rocket science (just two or three screws to be adjusted periodically), but you have to be prepared to get your hands dirty with the optics. Fortunately, Dobson beginners often have collimation aids, and forums are full of tutorials - if need be, a local astronomer can show you how. Finally, large diameters often mean imposing size A 200 or 250 mm Dobson takes up a lot of space! These are big tubes (1m+ long) on bulky bases. Make sure you have enough room to store and transport it (a small car can accommodate a 200 mm full tube, but beyond that you may need a dismountable model with a structure). And yet, paradoxically, a Dobson is still the best choice. transportable than many other tripod-mounted telescopes of the same diameter: no counterweight, no heavy metal stand - just the base (which can be used as a crate) and the tube. Two handles and you can move the whole thing around quite easily, especially on models up to 250 mm.
Preliminary conclusion on the dobson
In short, the Dobson it's a bit like the "big, sweet eater" of telescopes: lots of aperture, a huge appetite for photons, minimalist technology. Ideal for deep-sky and planetary imaging without breaking the bankIn exchange, you have to accept the manual follow-up and the space required. For a motivated beginner, this is often the choice n°1 recommended. But before we sell the caravan for a giant Dobson, let's take a look at the alternatives, and in particular the difference in price. alt-az vs equatorial mount for observation.
Alt-az versus equatorial mount
One of the dilemmas in amateur astronomy is the frame the structure that supports the telescope and enables it to move. There are two main types: the alt-azimuthal frames (Alt-Az) and equatorial frames. Without going into all the details, here's what you need to know about visual observation:
A alt-azimuth frame move in azimuth (left-right, like turning your head horizontally) and at altitude (up-down). It's a bit like a gun turret or a photo tripod. The Dobson we've described is a typical example of a simplified alt-az. The advantage is simplicity The intuitive movements correspond to our ground reference. No complicated set-up, just point the tube directly at the desired object. Visit disadvantageis that to track a celestial object (which moves diagonally across the sky due to the Earth's rotation), we need to adjust both axes at the same time in a coordinated way. In practice, this isn't too difficult to do manually at low magnification; for motorized tracking, on the other hand, alt-az requires two computer-controlled motors in parallel (it's very easy to do, though, as many consumer "GoTo" telescopes are motorized alt-az). The biggest drawback concerns long-exposure photography: an alt-az mount, even a motorized one, introduces an awkward field rotation for long-exposure astrophotography. But for the pure visualBut if you're looking for an alt-az, that's not a problem - our eyes don't notice the slow rotation over a few minutes. In short, alt-az is perfect for observe easily.
A equatorial mount moves on two axes, one of which is inclined to the earth's rotation axis. In other words, once properly oriented (called stationing), an equatorial can follow a celestial object by turning a single axis at constant speed (the famous sidereal velocity). This is great for track automatically a star or a planet: all you need is a small motor on the AD axis (right ascension) and the object remains effortlessly in the center of the eyepiece. That's why sky photographers love the equatorial. On the other hand, ergonomics for beginners are less intuitive: you have to think in celestial coordinates rather than "moving up-down/left-right". At first, pointing an equatorial manually can be confusing ("But why is my tube all crooked to aim at this object?!"). What's more, these mounts are often more cumbersome, costly and complex (counterweight bars, tripod, fine adjustments). In pure visual terms, an equatorial is not essential at all - it's mostly a matter of tracking comfort once it's set up. Let's just say it's a plus for observing at high power without having to crop, but it can be dispensed with at the cost of a little regular manual adjustment.
So what frame should you choose when you're just starting out in visuals? The alt-az frame is popular for its user-friendliness, and the Dobson is the ultimate incarnation. If your aim is to make long, high-magnification planetary observations, a small motorized equatorial may offer comfort (the image remains centered). But for the majority of visual applications, a good, stable alt-az will do just fine. Motorized versions are also available. GoTo of both types: there are Dobson GoTo (the alt-az base moves by itself to follow the object) and GoTo equatorials. Just remember that for visuals, the priority is stability and ease of use. It's better to have a solid Dobson that doesn't shake and that you can steer easily, than a shaky, low-end equatorial that will make you lose the object as soon as you touch the eyepiece... Sturdiness takes precedence over sophistication if you want to enjoy your observations with peace of mind.
In short, the alt-az frame (Dobson or other) is ideal for visual beginners: quick to set up, intuitive to use. The equatorial mount may come later if you're considering astrophotography, or if you want to motorize tracking now - but it does add to the budget. Many experienced astrams own both: a Dobson for quiet evenings of visual tracking, and an equatorial setup for sharp sessions or photography.
Overview of other types of telescopes
The Dobson/Newton is far from being the only option on the market. Without going into as much detail as in article 1, here's a small overview of optical formulas and how they compare:
Newton on equatorial mount - Ultimately, it's the same optics as the Dobson (primary mirror + 45° secondary mirror), but the tube is mounted on an equatorial mount rather than a ground base. Advantages: it's easy to motorize and track, and keeps the good value for money optics Newton. Disadvantage: the mount adds cost and weight, and the position of the eyepiece can end up at acrobatic angles when the tube moves (you sometimes end up with your head tilted strangely to look). In pure visual terms, many feel that a Newton on an equato combines all the disadvantages (volume + collimation + set-up) - which is why the Dobson has supplanted this configuration among beginners. Nevertheless, a small 150 mm Newton on EQ can be a versatile instrument (visual + a touch of planetary photography) for those who aren't afraid of a more technical set-up.
Schmidt-Cassegrain (SC) - Ah, the famous Celestron orange short-tube telescope you see in the ads! The Schmidt-Cassegrain is a telescope catadioptric It combines mirrors and a corrective lens. Its tube is compact (light travels back and forth several times via a central secondary mirror), making it very portable for the diameter offered. Standard SCs have f/D ratios of around f/10. In visual, a 200 mm SC is a highly versatile instrument: large enough for deep-sky work, and with a focal length of ~2000 mm, ideal for high-resolution planets and the Moon. They are often sold with fork mounts (Alt-az) with GoTo, making them very comfortable to use. The problem is the price It's more expensive per cm of diameter than the Newton. Also, the central obstruction (the secondary) reduces contrast a little compared with a telescope of the same diameter, but since telescopes of this diameter don't really exist (200 mm telescope = car budget...), we won't quibble. Let's just say thata TBS is an excellent all-rounder for visual pleasure and maybe do a bit of planetary and deep-sky photography later. Especially as you can easily put an SC on an equatorial later on. This is a common choice for the intermediate amateur. For a complete beginner, the budget may be an obstacle, but some second-hand 150 mm SC or 203 mm lenses can be found at affordable prices. Just be aware that the collimation of an SC is more stable than that of a Newton (we rarely do it), and the closed tube takes a little time to warm up (a little over an hour). Nothing dramatic.
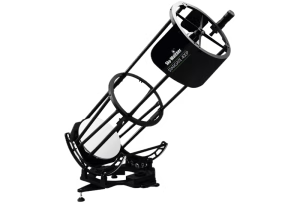
Example of a Schmidt-Cassegrain (SC) 203 mm diameter (Celestron EdgeHD) on a GoTo equatorial mount. These compact telescopes offer great versatility for visual observation and planetary imaging, at a higher cost than Newton/Dobson telescopes of the same aperture.
Maksutov-Cassegrain (Mak) - The SC's cousin, but smaller and often with a longer focal length (f/12 to f/15). Telescopes of the Maksutov have a closed design with a thick meniscus lens at the front. Highlights: sharp images (ideal for planets), ultra-compact tubes, no need for collimation (often factory-fitted on smaller models). 90 mm, 127 mm and 150 mm Mak models are available at reasonable prices. They're great for those who want a telescope that's easy to carry around, for example, from a balcony in town, and who essentially want to look at the Moon, planets, double stars... On the downside, field of view is very limited. very narrow because of the long focal length and small diameter: for extended deep sky (such as large nebulae, diffuse galaxies), this is not ideal. A 127 mm Mak can show M13 (globular cluster) or Orion, but it won't cover the entire Pleiades, for example. Also, it has a limited diameter - don't expect any miracles on very faint nebulae. Bottom line, the Mak is the planetary specialist or urban. Many beginners hesitate between Mak127 and Dobson 200, for example: one is very small and precise (but not very bright), the other big and bright (but less contrasted in pure planetary). It's all a question of compromise and... of what you want to observe first! In this case, you'll need to find out what your transport constraints are.
Astronomical telescope (refractor) - It's a modern version of Galileo's old telescope. From lenses instead of mirrors. Glasses have theaesthetics (a nice long metal tube looks great!), simplicity (no collimation, limited maintenance), and a image contrast often excellent (no central obstruction because no secondary mirror). For observing the planets or the Moon, a good 100 mm refractor works wonders, offering chiselled images. However, they suffer from two things chromaticism and the exponential cost with diameter. Chromatism is the appearance of colored bangs around objects, due to the difficulty of focusing all the colors at exactly the same point with simple lenses. Basic achromatic eyewear partially corrects this, but on shiny objects you may see a purple or yellow border. Top-of-the-range apochromatic glasses correct almost everything... but of course this comes at a price, even though they have become much more affordable and 103 mm apo glasses can be found for around 1000 chf (10 years ago this would have been unthinkable). And this is linked to the second point: making large High-quality lenses cost a fortune, much more than large mirrors. As a result, it's easy to find affordable 60 to 120 mm glasses, but prices soar above 120 mm. A good-quality 150 mm scope costs several thousand chf. At that price, you get a 400 mm Dobson! So.., the telescope is often chosen for small diameters (70 to 120 mm) for beginners who want a simple-to-use instrument, or for planetary enthusiasts looking for absolute contrast (and willing to accept a limited diameter). An added bonus: these small scopes often have a wide field of view, making them ideal for scanning entire constellations. On a stable alt-az tripod, an 80 mm can offer magnificent stellar strolls, showing finely chiselled lunar craters, Saturn's rings (tiny, but sharp), and even a few bright nebulae under a good sky. Let's not underestimate it.
Visit comparative summary for visual beginners :
Dobson (Newton alt-az) diameter champion by chf, best for visual deep sky, requires learning to point manually.
Newton equatorial same optical qualities, but with the added complexity of the mount. Advantage of being able to move on to astrophotography at a later date.
Schmidt-Cassegrain versatile and compact, good everywhere, but more expensive.
Maksutov ultra-compact, excellent for planetary images, limited in deep sky applications by its small diameter and narrow field of view.
Bezel easy to use, high-contrast images, but modest diameters (unless you invest heavily), super wide-field and planetary on small diameters.
Everyone has their own fans and specific uses. The important thing is to identify your needs If your dream is to admire distant galaxies from the countryside, a good, wide-open Dobson will do the trick. If you're living in an apartment and your main focus is on the Moon and Jupiter, a small Mak on a balcony will be more appropriate. There's no absolute wrong choice, as long as you understand what each instrument can and can't show you.
Practical tips for getting started
To conclude this post, here are a few tips from experience (and my initial admitted pellets!) for budding astronomers with their first telescope:
Don't just focus on magnification. (We've said it before, but it bears repeating.) Advertisements shouting "x800" are misleading. In real-life observation, we rarely go beyond 200×-300×, even with an already substantial instrument. The majority of celestial wonders are observed between 30× and 150×. So don't sacrifice optics for the promise of a far-fetched zoom. A magnificent deep sky at 50× is better than a blurred spot at 500×.
Prioritize diameter (or optical quality) in your budget. In other words, a simple but high-performance telescope is better than a gadget packed with cheap electronics. For example, for ~300€, a 150 mm manual Dobson far surpasses a 90 mm plastic GoTo telescope in terms of what you'll see in the eyepiece. The temptation of high-tech gadgetry is strong, but remember that in the end what you'll enjoy are the images of the stars, not the push of a button. The Dobson excels in this respect offering maximum optics for minimum cost.
Think logistics. Where do you mainly observe? If it's the backyard, a bulky instrument is no problem. If you have to carry it up 4 flights of stairs or take it for a drive every time, think about weight and size. A telescope in a cupboard doesn't observe anything at all... Choose a model suited to your carrying and handling capacity. For example, a 254 mm Dobson is fabulous... but it weighs over 20 kg and takes up a lot of space. A 200 mm is already more compact and often sufficient for beginners. Similarly, a 120 mm scope on an equato mount can be cumbersome in a small apartment - perhaps a 130 mm tabletop Dobson or a Mak 100 would be more suitable for everyday use.
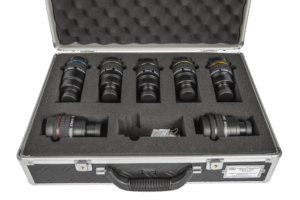
Useful accessories For the visual, plan a few decent-quality eyepieces covering low, medium and high magnifications. Telescopes often come with 1 or 2 basic eyepieces (e.g. a 25 mm and a 10 mm). This is just the beginning. A good 30 mm wide-field eyepiece can transform your deep-sky observations by offering a porthole to the Milky Way. Conversely, a better-made 6 or 8 mm eyepiece will give you a sharper planetary view. Little by little, investing in 2-3 suitable eyepieces makes a difference. A researcher (red dot finder or spotting scope) is essential for easy pointing - fortunately, most telescopes are equipped with one. Eventually, a lunar filter can be useful for dimming the Moon's glare (it can be so bright that it can dazzle a large telescope). Finally, consider theadapting your vision To preserve your night vision, you should observe in the dark, avoid white lights and use a red lamp for maps, etc.
Patience and wonder: The first few nights, you may feel a little clumsy, searching for M31 for 30 minutes without success... That's part of the game! Don't give up too quickly. The sky requires patience, but the first time you Saturn will appear with its ring in your eyepiece, or that you will see with your own eyes a distant galaxyYou'll immediately forget any initial difficulties. Take the time to observe each object, to refine your focus, to perceive details gradually (the eye learns). Astronomy is a school of patience, but it's also rich in emotions.
By following these tips and choosing the right telescope for your needs (many people opt for a Dobson 200 mm or 254mm as their first multi-purpose instrument, and they're delighted), you'll have every chance of enjoying unforgettable nights of observation. The sky is brimming with treasures right before your eyes. All you have to do is switch off the lights, point your new instrument and enjoy this visual journey through the Universe. Happy observing!
To provide the best experiences, we use technologies such as cookies to store and/or access device information. Consenting to these technologies will allow us to process data such as browsing behavior or unique IDs on this site. Failure to consent or withdrawal of consent may adversely affect certain features and functions.
Functional
Always active
Storage or technical access is strictly necessary for the legitimate purpose of enabling the use of a specific service explicitly requested by the subscriber or user, or for the sole purpose of transmitting a communication over an electronic communications network.
Preferences
Storage or technical access is necessary for the legitimate purpose of storing preferences not requested by the subscriber or user.
Statistics
Storage or technical access used exclusively for statistical purposes.Storage or technical access which is used exclusively for anonymous statistical purposes. In the absence of a subpoena, voluntary compliance by your Internet service provider or additional third-party records, information stored or retrieved for this sole purpose generally cannot be used to identify you.
Marketing
Storage or technical access is necessary to create user profiles in order to send advertisements, or to track the user on a website or on several websites with similar marketing purposes.