When you're just starting out and want to choose a telescope, the optical jargon can seem intimidating. Should you opt for a large "Magnification ? A great "diameter ? A long "Focus ? The report f/dAm I supposed to care?
Don't panic, let's untangle these fundamental notions of telescope optics together. In this article, we're going to the essentials without too much headache. I'll explain what it means focal length, diameter and report f/D (focal length vs. diameter) and how they influence your choice of telescope. Fasten your seatbelts, we're off on an educational journey (with a touch of humor) through the basics of astronomical optics!
Contents
Focal length and diameter : what are we talking about? - Definition of a telescope's focal length and diameter, and why they are important.
Magnification Understanding the role of focal length and eyepiece in magnification, and why more isn't always better.
The f/D ratio (or aperture): fast or slow? - Explanation of the focal/diameter ratio, its impact on brightness and field of vision, with concrete examples.
Focal length and diameter: what are we talking about?
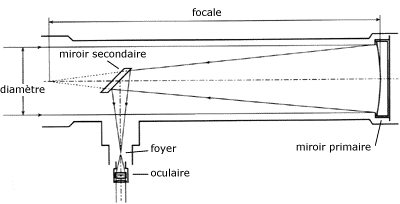
First of all, let's define two parameters found on most commercial instruments: focal length and diameter (also known as aperture). For example, a telescope called "130/900" means it has a diameter of 130 mm and a focal length of 900 mm. The diameter is the diameter of the telescope's mirror or main lens - in other words, the size of the "aperture" through which light enters. The focal length, on the other hand, is the distance (in mm) between the mirror/lens and the point where the image is formed (the focus). It's the length of the path taken by the light in the tube to focus.
Figure 1- Diagram of a telescope, showing the notion of diameter and focal length (here, a newton is shown).
Why are these two numbers so important? The diameter determines the amount of light collected and the separating power (resolution) of the instrument. Basically, the larger the diameter, the more photons are collected, and the finer the details that can be discerned. A large diameter therefore enables us to see fainter objects and reveal their details. Conversely, a small diameter "captures" less light - objects appear less luminous and less detail can be seen. You'd think that's all there is to it, that it's just a question of size, and that this parameter should be maximized. As you can imagine, this article is several pages long because it's not that simple! Otherwise, it wouldn't be funny! A large telescope will generally be heavier and bulkier, which can make it more difficult to transport and set up. But the best telescope is the one you use often. So you need to find a compromise between diameter, size and weight that's right for every situation.
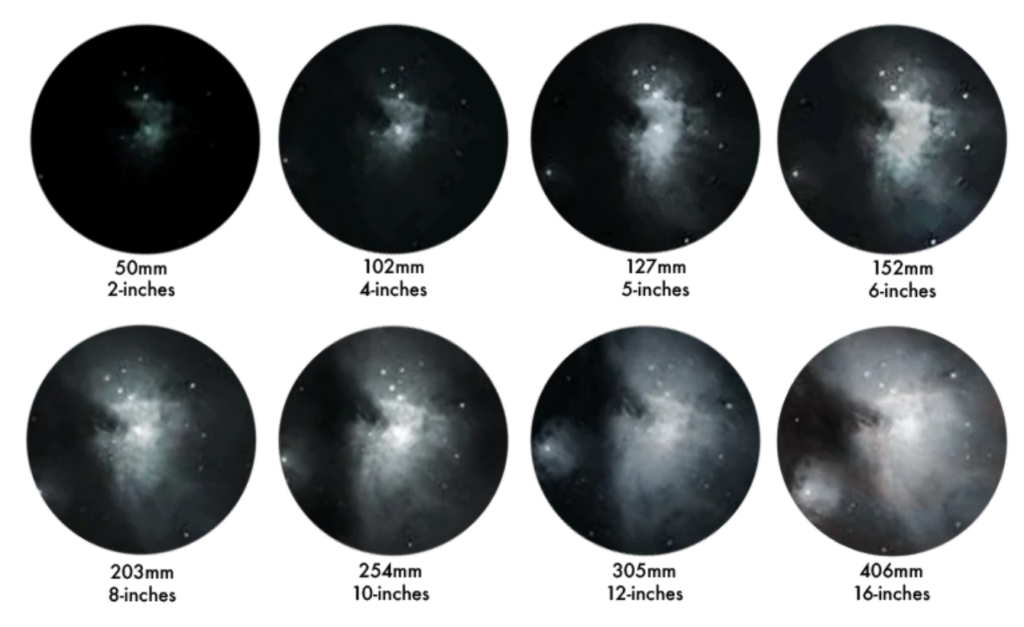
Below is a comparison of the influence of diameter on the ability to see a deep-sky object.
Figure 2 - A rough comparison of the impact of diameter on the ability to see object details. Source: Explore Scientific
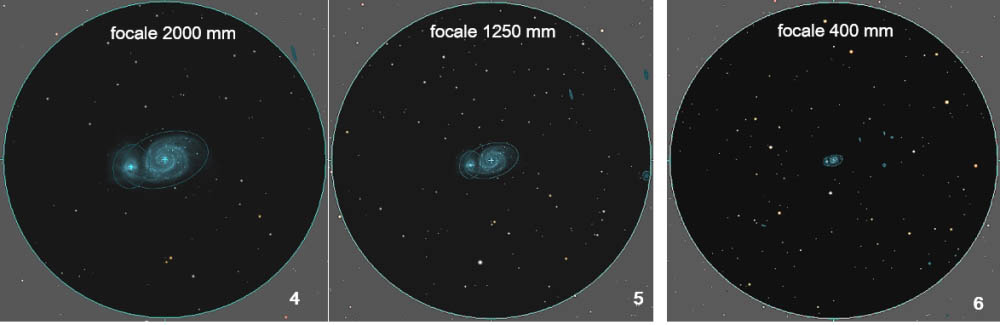
The focal length, in turn, influences the scale of the image formed. A long focal length will produce an enlarged image, a "big zoom", while a short focal length will produce a smaller image (but a wider field of vision). But beware: the telescope's focal length is no guarantee of "image quality" in itself. You might think that a telescope with a long focal length is better, but it's not that simple - we'll come back to the famous f/D ratio. For now, remember that focal length = length of (light) tube and diameter = aperture for light. These two values are indicated on all telescopes, often in the form D/F (e.g. 130/900 as seen above).
Figure 3 - Demonstration of the impact of focal length on object visibility, all else being equal. Source PG Astronomie
Magnification: the great temptation
Let's talk about a concept that makes beginners dream (and sometimes trap): magnification. Who hasn't been fascinated by a telescope boasting "×500 magnification"? Yet this is far from being the main criterion for choosing a telescope. In fact, I'd say you should never think in terms of magnification.
The magnification your telescope will produce is related to :
For example, with our 900 mm telescope, a 10 mm eyepiece will give 90× magnification (900/10 = 90). The same telescope with a 25 mm eyepiece will only give 36× magnification, and with a 5 mm eyepiece 180×. So, a salesman can advertise "x500" on almost any tube, as long as he delivers a tiny 4 mm eyepiece! You see the trap...
In practice, pushing an instrument to its theoretical maximum magnification often results in a blurred, dark image. The golden rule: maximum useful magnification is around 1.5 to 2× the diameter in millimeters. For example, a 130 mm telescope can hardly support more than ~260× without losing a great deal of quality. Beyond that, the image becomes blurred and dark, as little light is spread over a lot of zoom. On the contrary, moderate magnifications generally offer brighter, sharper images. It's better to have a small, well-defined image than a large, blurred one!
To obtain different magnifications, you simply change eyepieces. A seasoned amateur astronomer will often own between 5 and 10 different eyepieces!
As I said earlier, the telescope itself contributes via its focal length: a long focal length enables high magnifications to be achieved with standard focal length eyepieces. For example, with a 2000 mm telescope, a 10 mm eyepiece already gives 200×. Conversely, a 500 mm focal length instrument would require a 2.5 mm eyepiece for the same 200× (not very comfortable and rarely supplied).
But beware: the more you magnify, the more the luminosity per surface decreases - you end up seeing nothing at all. Without sufficient light collection (i.e. a suitable diameter), magnification is useless. That's why a small 60 mm telescope magnified to 300× will actually show you... a dark mush.
We don't think about it enough - until we've been planetary - but we mustn't forget the atmosphere. You've probably already seen the air over a road in summer. This phenomenon is called atmospheric turbulence and will often be the limiting factor in your observations at high magnification. The optimum magnification will therefore not be the same every evening, depending on the stability of the air layer. But then, who can do more can do less. Which reinforces the importance of having several eyepieces.
In short: don't be dazzled by the promise of huge magnifications on some consumer telescopes. This is not the determining factor in seeing the stars. Give priority to diameter (and optical quality) above all, then use appropriate eyepieces to modulate the zoom.
And by the way, you won't see any telescope on this site described by its magnification, because that's a misleading marketing argument!
The f/D ratio (or aperture): fast or slow?
Let's move on to a slightly more technical but crucial notion: the f/D ratio (focal length to diameter), also known as the telescope's relative aperture. It's a notion that's particularly relevant to astrophotography. When it comes to visuals, who really cares? I'll come back to this aspect at the end of the article.
The relative aperture is simply calculated :
f/D = focal length ÷ diameter
For example, a 200/1000 telescope has an f/D = 1000/200 = 5 (often referred to as f/5). This is a unitless ratio, similar to aperture in photography. We'll say that a telescope is "open at f/5" in this example.
Why bother? Because this ratio influences the optical behavior of the instrument, in particular image brightness and the field of view. In general :
A low f/D (e.g. f/2.2 to f/4) means an "open", or fast, instrument. It provides a wide field of view, a brighter image for extended objects, but lower native magnification. It's ideal for deep-sky photography - these "fast" telescopes pick up a lot of light quickly, which is good for nebulae and galaxies scattered across the sky.
A high f/D (e.g. f/10 to f/15) indicates a "closed", slow-moving instrument. It will give a narrower field of view and darker images at equal magnification, but allows high magnifications more easily (because the focal length is long). This is the ideal condition for planetary photography: zoom and contrast on small, luminous objects (planets, Moon) are preferred to wide field.
In short, the focal/diameter ratio affects the telescope's "speed". Astronomers refer to telescopes as fast (f/D small) or slow (f/D large). To image a diffuse object, a "fast" instrument will give a brighter image in less time. To observe a tiny planetary detail, a "slow" instrument will deliver high magnifications with good resolution.
As you'll have noticed, for the f/D we've mainly talked in terms of astrophotography, because it's very important to understand something:
For the visual, what counts is the diameter
For astrophotography, it's f/D
You can easily observe superb galaxies at f/15. On the other hand, with this same telescope, as you'll be at an aperture ratio of 15, astrophotography, while perfectly possible, will require a lot of exposure time.
Conclusion and outlook
As a conclusion to these basics, remember this: the perfect telescope doesn't exist, but by understanding focal length, diameter and f/D, you'll know what compromise any given instrument is aiming for. Diameter determines luminosity and resolution (you want the biggest possible... except that budget, weight and size get in the way). This is what should concern you most in visual terms.
The focal length influences the field of view and possible magnification (long for planetary, short for wide-field deep sky).
The f/D ratio sums up the "aperture": a small number for a bright, wide-field telescope, a large number for a sharp, high-zoom telescope. Necessary for astrophotography, but of little use for visuals.
Armed with this knowledge, you'll be ready to decipher technical data sheets and avoid marketing pitfalls.
In the next article, we'll take a closer look at how to choose a telescope for visual observation, featuring an instrument that's a firm favourite with observers: the Dobson.
To provide the best experiences, we use technologies such as cookies to store and/or access device information. Consenting to these technologies will allow us to process data such as browsing behavior or unique IDs on this site. Failure to consent or withdrawal of consent may adversely affect certain features and functions.
Functional
Always active
Storage or technical access is strictly necessary for the legitimate purpose of enabling the use of a specific service explicitly requested by the subscriber or user, or for the sole purpose of transmitting a communication over an electronic communications network.
Preferences
Storage or technical access is necessary for the legitimate purpose of storing preferences not requested by the subscriber or user.
Statistics
Storage or technical access used exclusively for statistical purposes.Storage or technical access which is used exclusively for anonymous statistical purposes. In the absence of a subpoena, voluntary compliance by your Internet service provider or additional third-party records, information stored or retrieved for this sole purpose generally cannot be used to identify you.
Marketing
Storage or technical access is necessary to create user profiles in order to send advertisements, or to track the user on a website or on several websites with similar marketing purposes.