The Moon has fascinated mankind since the dawn of time. Visible to the naked eye as the brightest star in the night sky, it has long been the stuff of legend and curiosity. However, it wasn't until 1609 that Galileo first observed the Moon's contours using an astronomical telescope. Since then, the Moon has never ceased to be studied, until humans finally set foot on it in 1969 with the Apollo 11 mission. Even today, our natural satellite continues to amaze amateur astronomers. This educational guide will help you get to know the Moon better and observe it in the best possible conditions, even if you're new to astronomy.
Introducing the Moon
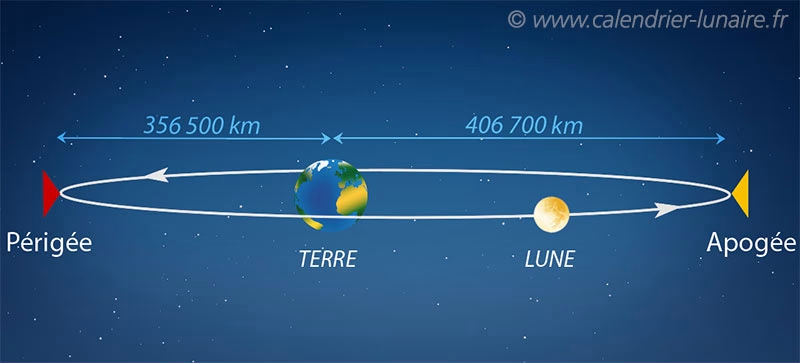
The Moon is Earth's only permanent natural satellite, and one of the largest in the Solar System. With a diameter of around 3,474 km (almost a quarter the size of Earth) and over 4.5 billion years old, it orbits our planet at an average distance of about 384,400 km (i.e. ~30 times the Earth's diameter). This celestial neighbor exerts a crucial influence on our world: its gravitational attraction generates the tides The presence of the Moon stabilizes the inclination of the Earth's axis, guaranteeing a stable climate and regular seasons. Without the Moon, the tides would be weaker and the Earth's axis of rotation could wobble considerably, upsetting the seasonal cycle.
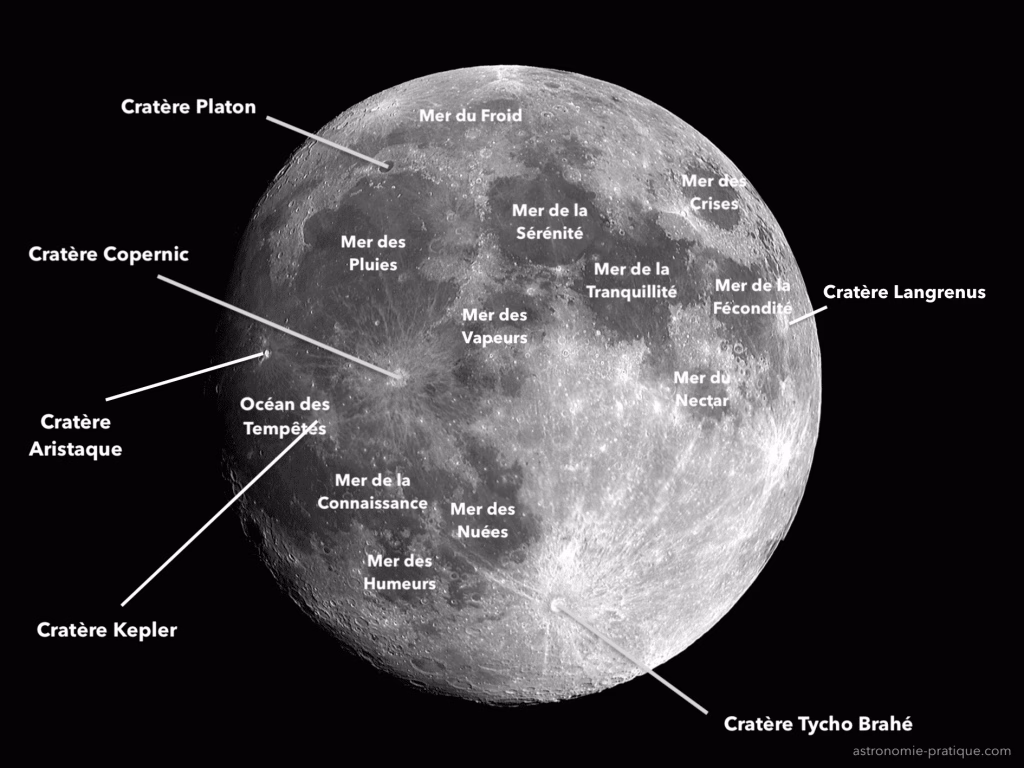
Unlike a star, the Moon produces no light of its own: it shines by reflecting the light of the sun. Sun. In synchronous rotation around the Earth, it always presents us with the same side visible . It is characterized by vast dark spots called lunar seas - in reality ancient plains of solidified lava - which contrast with the clearer, higher regions, riddled with craters. The lunar surface is devoid of atmosphere and hardly ever changes: each meteorite impact leaves an indelible mark. The footprints left by the Apollo astronauts can still be seen decades later, as no air or wind can erase them. All these features make the Moon a fascinating star to discover for any amateur astronomer.
Moon phases
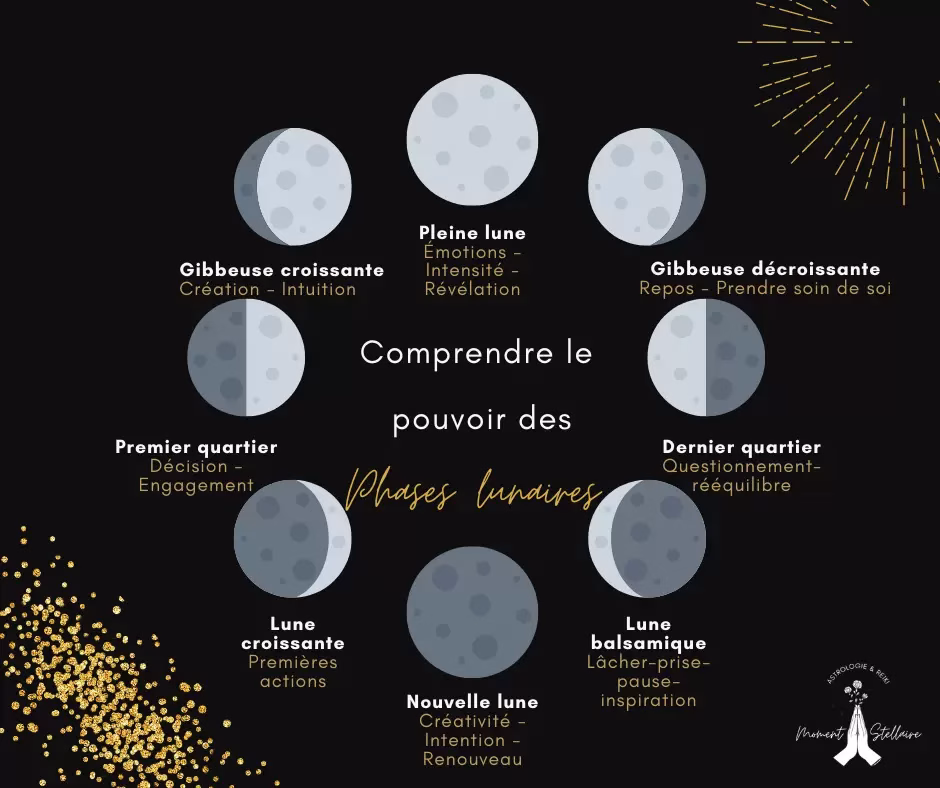
The eight phases of the lunar cycle, from new Moon 🌑 to full Moon 🌕, follow one another in just under a month. Half of the Moon is always illuminated by the Sun, but we see a different portion of it depending on the position of the star in its orbit around the Earth .
Seen from the Earth, the Moon's appearance changes in a cycle called the "moon cycle". lunationwhich lasts approximately 29.5 days. During this cycle, the Moon passes through eight main phases :
New Moon (Black Moon) - the Moon is almost aligned between the Sun and the Earth, presenting us with its unlit side. It is therefore virtually invisible in the sky.
First croissant - a thin, luminous crescent appears shortly after sunset, just after the new Moon. Each evening, this crescent becomes a little thicker.
First quarter - About a week after new moon, we see the illuminated half of the lunar disk (in the shape of a "D"). The Moon has now reached a quarter of its orbit. It rises around noon and sets around midnight, making it clearly visible in the early evening.
Waning gibbous moon - between first quarter and full moon, the illuminated portion exceeds half: the Moon appears almost round, the gibbous phase (domed) increasing .
Full Moon - About two weeks after the new moon, the Moon is opposite the Sun in relation to the Earth. It then shows us its entire illuminated face, perfectly round and very bright. It is during this phase that the lunar eclipseswhen the Moon passes into the Earth's shadow.
Waning gibbous moon - after full moon, the illuminated portion begins to diminish (waning phase). The Moon remains almost full (gibbous) but diminishes each day, rising later and later in the evening.
Last quarter - we again see half of the disk illuminated (in the shape of an inverted "C"), the other half in shadow. This quarter Moon rises around midnight and peaks at the end of the night, being visible mainly in the morning sky.
Last croissant - At the dawn of the few days preceding the new moon, the Moon is no more than a thin, illuminated crescent in the morning sky. This crescent diminishes until it disappears, bringing the cycle to a close.
Every lunar month, the Moon goes through all these phases. Note that the Moon's apparent shape changes (from invisible to full moon), but that the Moon itself does not change in size - it's the angle at which we see its illuminated part that varies. Note that it is quite possible to see the Moon in daylight during certain phases: for example, a first quarter is visible in the afternoon and early evening, while a last district appears late at night and early in the morning. The cycle finally begins again at the next new Moon. With a little practice, you'll be able to identify the current phase at a glance, whether it's a discreet crescent or a brilliant full Moon.
What you can see on the Moon
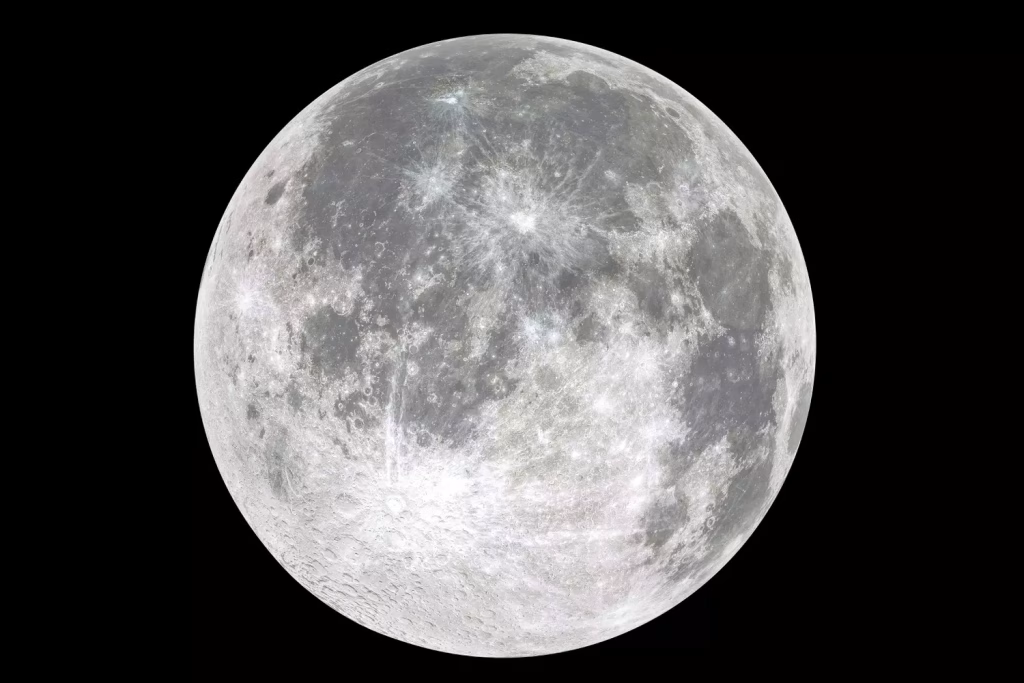
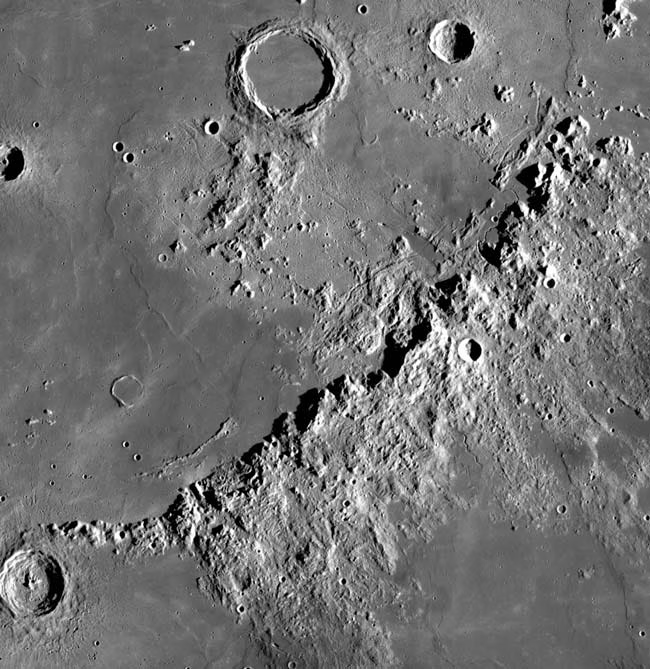
The Moon's surface is dotted with impact craters. In this photo, two famous craters are marked: Copernic (C) and Tycho (T). Their vast systems of clear ejecta ("rays") stand out on the lunar surface, a sign of relatively recent craters. These formations are easy to spot with binoculars. .
What can you see when you look at the Moon? With the naked eye, we can already see many details, and with optics (binoculars or telescope), we can access a veritable extraterrestrial landscape. Here's an overview of the lunar wonders available, depending on your observation equipment:
To the naked eye
Without any instruments, you can admire the ashy light of the Moon and its chiaroscuro patterns. When the Moon is a thin crescent, the dark part of the disk is faintly illuminated by the reflection of terrestrial light: this is ashen light, a subtle but magnificent sight visible at dawn or dusk. At a more advanced stage, the naked eye can make out the large dark spots (the lunar seas) and brighter areas. These contrasts give rise to evocative shapes, the source of many legends: many people, for example, see the face of a "man in the Moon", while other cultures imagine it as a rabbit or other figures. Even if the fine details escape the unequipped observer, following the evolution of phases day after day with the naked eye is a fascinating exercise for the beginner.
Through binoculars
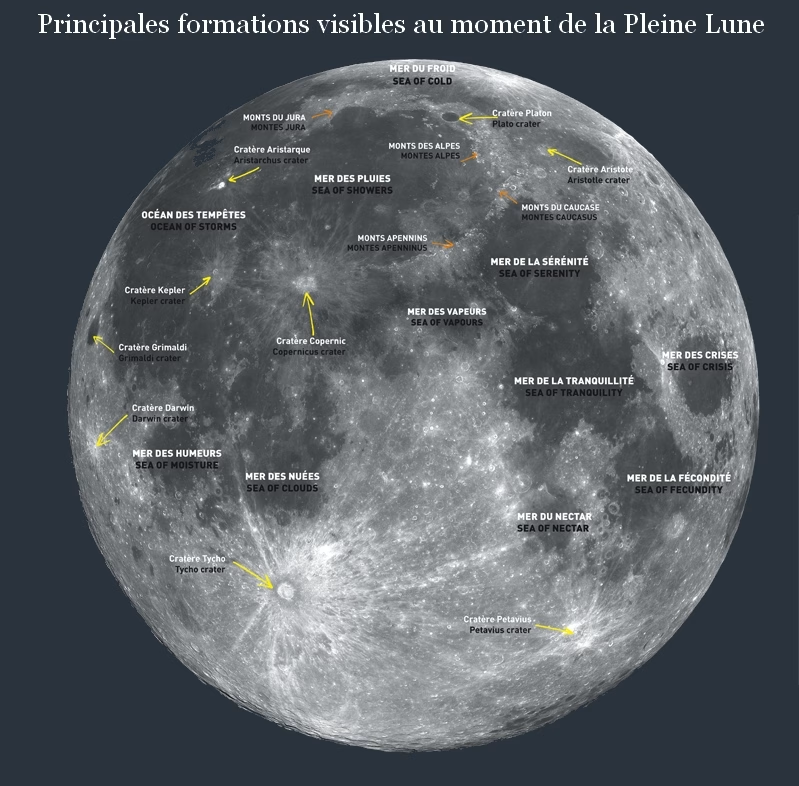
From binoculars offer a quantum leap in lunar exploration. With a current model (7× to 10× magnification), the Moon reveals hundreds of craters and much more detailed light and dark areas. In particular, we can observe the famous lunar "seas" up close, and spot the largest craters on the visible face. For example, the Tychoon the Moon's southern edge, appears as a bright spot surrounded by clear rays when the Moon is full. Another large crater, Coperniccan be seen in the north-western part of the seas with a clear outline. Even Claviusone of the largest lunar craters, can be seen from the south, especially in low-angled light. Binoculars can also be used to follow mountain ranges lunar landscapes bordering seas, such as the Montes Apenninus near the Sea of Rains. To make the most of these views, try observing around the terminator (the line separating day and night on the Moon): this is where relief is accentuated by shadows, offering a striking spectacle. A word of advice: use a stable support (rest your elbows on a table, or mount your binoculars on a tripod) to reduce the shaking amplified by magnification. With simple, stable binoculars, you'll be amazed at the richness of the lunar landscapes available.
Through the telescope
A telescope or a telescope opens up even more possibilities. Even a small beginner's instrument will reveal a multitude of possibilities. craters of all sizes, from the largest basins to craters a few dozen kilometers across, invisible to binoculars. By pointing your telescope along the terminator, you'll be able to admire first-hand the play of light and shadow at the bottom of the craters and on the lunar mountains. For example, the Tycho crater will reveal its central peak in the middle of its bowl, casting its shadow on the ground. The Copernicus crater, meanwhile, offers a glimpse of its terraced inner ramparts with a moderate aperture. On a calm night, you can make out the silhouette of the Apennine Mountains and Lunar Mount Blancor the straight fault called Rupes Recta in the Apennine massif, identifiable as a thin line of shadow on certain days of the cycle. Of course, the larger the diameter of your instrument, the more you'll be able to magnify and discern small details (craters a few kilometers across, volcanic domes, grooves, etc.). However, bear in mind that too much magnification can make the image blurred or too dark, and that atmospheric turbulence limits useful resolution. In practice, with a telescope 100 to 150 mm in diameter, you can already obtain splendid views of the Moon with an impressive level of detail. Tip To avoid being dazzled by the brightness of the full moon through the eyepiece, you can use a lunar filter which will attenuate its brightness without masking the details. In any case, telescopic observation is a veritable virtual journey: take the time to patiently explore the lunar surface, crater by crater, and savor the extraterrestrial landscape before your eyes.
How to observe the Moon
Observing the Moon is relatively straightforward, but there are certain times and precautions you can take to get the most out of it. Here are a few tips to optimize your observations:
Choose the right moment Contrary to popular belief, the full moon is not the ideal time to observe lunar detail. It's true that the Moon is very bright, but this brilliance crushes shadows and flattens relief. You risk being dazzled and seeing fewer contrasts. The best times to observe Moon details are around the first or last quarter This is when the Sun grazes the lunar surface along the terminator. Craters and mountains cast long shadows, clearly revealing the relief. A thin crescent just after the new moon (the young Moon at dusk) is also magical to contemplate, all the more so as you can admire the ashen light on the darker portion. On the other hand, if your objective is to study the surface of the Moon, avoid observing it right at full moon: be satisfied with the overall spectacle of the bright Moon, then come back a few days later for the details.
Wait for ideal conditions A sky clear is essential. The Moon can easily penetrate urban light pollution (its clarity is not affected by street lamps), but a clean sky and calm atmosphere will improve image sharpness. If possible, observe when the Moon is high in the skyto view through a thinner, less turbulent layer of atmosphere. Avoid evenings when the Moon remains very low on the horizon, as atmospheric turbulence and thick air can cause it to flicker or shake, blurring details. What's more, there's no need to wait until dark for the Moon: in crescent or quarter phase, it can be seen in full sunlight. twilight or even in broad daylight, so you can observe it early in the evening before the stars are visible.
Safety first The Moon itself presents no danger to the eyes - you can contemplate it without risk, even with binoculars or a telescope (at worst, its brilliance can temporarily dazzle, hence the possible interest of a lunar filter for comfort). On the other hand, never point your binoculars or telescope at the Sun ! It seems obvious, but when you're just starting out, you may be tempted to point at a bright star and think it's the Moon, when in fact it's the Sun. Remember that observing the Sun directly without an appropriate filter causes irreversible eye damage. So, if you're observing during the day, make sure the target is the Moon and not that other dangerous luminous disk. It's good practice to spot the Moon first with the naked eye (it's much paler than the Sun), then point your instruments at it with a clear eye. This basic precaution will enable you to enjoy your lunar observations in complete safety.
Recommended equipment for getting started
Good news: to observe the Moon, no need for expensive equipment at the outset. Here's an overview of what's recommended for beginners wishing to explore our satellite.
Binoculars A simple pair of binoculars is often a beginner's first "astronomical instrument". This is because, all binoculars are suitable to see the Moon, but it is advisable to choose models with lenses of 42 to 50 mm diameter and a magnification of 7 to 10 times (e.g. 8×42 or 10×50). This format offers a good compromise between image brightness, field of view and stability (beyond 10×, it becomes difficult to hold the image without shaking). With standard 10×50 binoculars, you can already make out the main craters and lunar seas. There are also larger astronomical binoculars (70 mm or 80 mm in diameter) with higher magnification, providing even more detailed views of the Moon, but they are heavier and ideally require a tripod. If you have them, don't hesitate to use them, otherwise your standard household binoculars will do just fine to start exploring the Moon.
First telescope To take your observation further, a small telescope or telescope for beginners is the next step. A 60 to 70 mm refractor diameter telescope on a simple (azimuthal) mount is a classic for beginners. This type of instrument, often very affordable (in the €100-200 range), reveals the Moon's surface in greater detail, and gives a better view of luminous planets. Choose a 70 mm if possible, as 60 mm is a bit tight for fine details, and make sure the mount is stable (cheap kits sometimes have rather flimsy tripods: a sturdy azimuth mount, even without a motor, will make observing much more comfortable). A 70/700 refractor (70 mm aperture for 700 mm focal length, for example) will show you the Moon with great clarity: main craters, mountains, and even details such as crevasses or the inner craters of large basins will be within your reach.
Telescopes for beginners If your budget and your desire allow it, a small telescope with a larger diameter will deliver enhanced performance. For example, the mini-Dobson table 114 to 130 mm are very popular with beginners for their simplicity (no cumbersome stand, just place the telescope on a table or stand) and superior brightness to that of a 70 mm telescope. These compact, mirror-based telescopes often cost between €200 and €400. They collect much more light, which improves resolution and brings out more craters on the Moon. Another classic option is the 130 mm Newtonian telescope on an equatorial or azimuth mount (e.g. 130/650), which will give very fine lunar and planetary views. Pay particular attention to the frame stability A larger diameter is only useful if the telescope doesn't vibrate at the slightest touch. With a 130 mm telescope correctly mounted, you can push the magnification to 100× or more in good conditions, enough to explore the Moon in depth. Finally, let's not forget the useful accessories one lunar filter (neutral or polarizing) is often recommended for observing the full or gibbous moon, to reduce glare while enhancing contrast. This small filter, which can be screwed onto the eyepiece (at a modest cost), makes observation much more comfortable when the Moon is very bright.
Mobile applications and useful resources : Nowadays, technology can greatly assist your observation evenings. From astronomy applications on your smartphone or tablet to help you spot the Moon and identify its details. For example, the Stellarium is a real pocket planetarium that displays a realistic sky in real time and lets you locate the Moon, display its phase and even name the visible craters. Another popular app, SkySafarioffers a rich database on the Moon and other celestial bodies, with the option of pointing a connected telescope. Other features include SkyView, Star Walkor Sky chart (Google Sky Map), which are a fun and intuitive way to find your way around. In addition to these applications, don't hesitate to use a lunar map to put names to the seas and craters you see. Many astronomy websites and books contain simplified lunar atlases for beginners. These tools will help you enrich your observations by identifying the famous crater or lunar sea you're looking at.
Anecdotes and practical advice
Finally, here are a few anecdotes and practical tips to make your lunar observing evenings even more rewarding and fun:
The Moon illusion Have you noticed that the Moon sometimes looks huge when it's close to the horizon, then smaller high up in the sky? This phenomenon is not due to an actual change in size, but to a well-known optical illusion called lunar illusion. Close to the horizon, the Moon appears larger, when in fact it is the same apparent size as at its zenith. Our brains, influenced by horizon elements, play tricks on us! The next time you see a huge full moon rising, think about this illusion - and test it with a simple dial or by photographing it: its diameter will remain identical. Understanding this amusing phenomenon adds a touch of science to your wonder.
The Moon recedes... slowly The Moon is not fixed forever in its current orbit. In fact, it is moving very slowly away from the Earth, by about 3.8 cm per year . This shift is caused by gravitational interactions with the Earth (the tides transfer some orbital energy to the Moon). On the scale of a human lifetime, this remains imperceptible, but over millions of years it could have consequences, such as the end of total solar eclipses in the distant future (the Moon will then appear too small to completely cover the Sun). This anecdote illustrates just how dynamic the Earth-Moon system is, even if the changes are very slow.
Poetic names As you explore the map of the Moon, you'll discover that many places have evocative names. Visit lunar seas are poetically named: Mer de la Tranquillité, Mer des Pluies, Mer de la Sérénité, Océan des Tempêtes... Most of these names date back to the time when they were thought to be real seas. Similarly, craters are often named after famous scientists and astronomers (Tycho honors Tycho Brahe, Copernicus honors Nicolaus Copernicus, etc.). Learning some of these names and their history can make your observations more fun, giving you the impression of traveling on a celestial treasure map. For example, did you know that the Apollo 11 mission landed in the Sea of Tranquility? Spotting this area through your telescope adds a historical dimension to your observation.
Participatory and fun observation : Share your lunar evenings with family and friends. The Moon is an ideal star for introducing children to astronomy: show them how to spot a crater or draw the phases as the night goes by. You can also keep a observation notebook where you can write down your impressions, sketch what you see through the eyepiece, or why not try photographing the Moon with a smartphone held behind the eyepiece (afocal technique) for a souvenir. Take part in observation evenings organized by a astronomy club local, if possible on moonlit nights: amateur astronomers will be delighted to show you the Moon through various instruments and share their anecdotes. All of which makes learning more convivial and stimulating.
By combining these fun and educational approaches, you'll gradually develop your eye and your knowledge. The Moon will no longer be just a white disk in the sky, but a familiar world whose landscapes and secrets you'll learn all about.
Conclusion
Accessible, brilliant and enchanting, the Moon is the ideal star for beginners in amateur astronomy. In just a few nights, you'll learn to recognize its phases and spot its main formations - from dark seas to dazzling craters - with the naked eye, binoculars or a small telescope. Each observation will bring its share of discoveries, whether it's a mountain revealing itself at the edge of the shadows, a play of ashen light setting the crescent ablaze, or simply the thrill of contemplating the same landscape trodden by astronauts. By following the practical advice in this guide and using the resources available (maps, applications, clubs), you'll make rapid progress and gain confidence in your lunar explorations.
All you have to do is look up and let our satellite guide you: good lunar observations and welcome to the adventure of amateur astronomy!
Sources : Astronomie pratique & amateur astronomy sites , popular publications (Numerama, Futura-Sciences) , beginners' guides (Stelvision, specialized blogs) , Wikipedia for general data . Additional resources include the Stellarium and SkySafari applications, and local astronomy clubs for guided observations. Take advantage of this opportunity to expand your knowledge and, above all, enjoy contemplating the Moon from every angle!
To provide the best experiences, we use technologies such as cookies to store and/or access device information. Consenting to these technologies will allow us to process data such as browsing behavior or unique IDs on this site. Failure to consent or withdrawal of consent may adversely affect certain features and functions.
Functional
Always active
Storage or technical access is strictly necessary for the legitimate purpose of enabling the use of a specific service explicitly requested by the subscriber or user, or for the sole purpose of transmitting a communication over an electronic communications network.
Preferences
Storage or technical access is necessary for the legitimate purpose of storing preferences not requested by the subscriber or user.
Statistics
Storage or technical access used exclusively for statistical purposes.Storage or technical access which is used exclusively for anonymous statistical purposes. In the absence of a subpoena, voluntary compliance by your Internet service provider or additional third-party records, information stored or retrieved for this sole purpose generally cannot be used to identify you.
Marketing
Storage or technical access is necessary to create user profiles in order to send advertisements, or to track the user on a website or on several websites with similar marketing purposes.