Choosing an astrophotography camera becomes much easier when you start by defining how you’ll use it. A camera intended for nebulae and galaxies isn’t chosen based on the same criteria as a camera for Jupiter, the Moon, or the Sun. For deep-sky photography, I first look at sensor size, cooling, readout noise, and sampling rate. For planetary and solar photography, pixel size, frames per second, and the ability to crop the image become essential.
In this guide, I'll focus on three brands that I find particularly interesting: ToupTek, Player One Astronomy and ZWO. All the models listed are available directly from Deep Space Astronomy in Switzerland. The links lead to the product pages on the website.
My short answer, based on your project
To get started with deep-sky astronomy on a budget: the ToupTek ATR585C or the ZWO ASI585MC Pro. Their IMX585 sensor is smaller than an APS-C sensor, but it is sensitive, produces clean images, and is much easier to use with modest lenses.
To build an excellent APS-C color setup right away: the ToupTek ATR2600Cthe Player One Poseidon-C Pro or the ZWO ASI2600MC Pro. All three use the IMX571 sensor family, with 26 megapixels and 3.76 µm pixels. The choice comes down mainly to the ecosystem, the hardware, the accessories, and how you want to control the setup.
To reduce the number of cables and simplify cable routing: the ZWO ASI2600MC Duo includes a second guide sensor. This is a very attractive option if you want to stay within the ZWO ecosystem and avoid adding a separate guide camera.
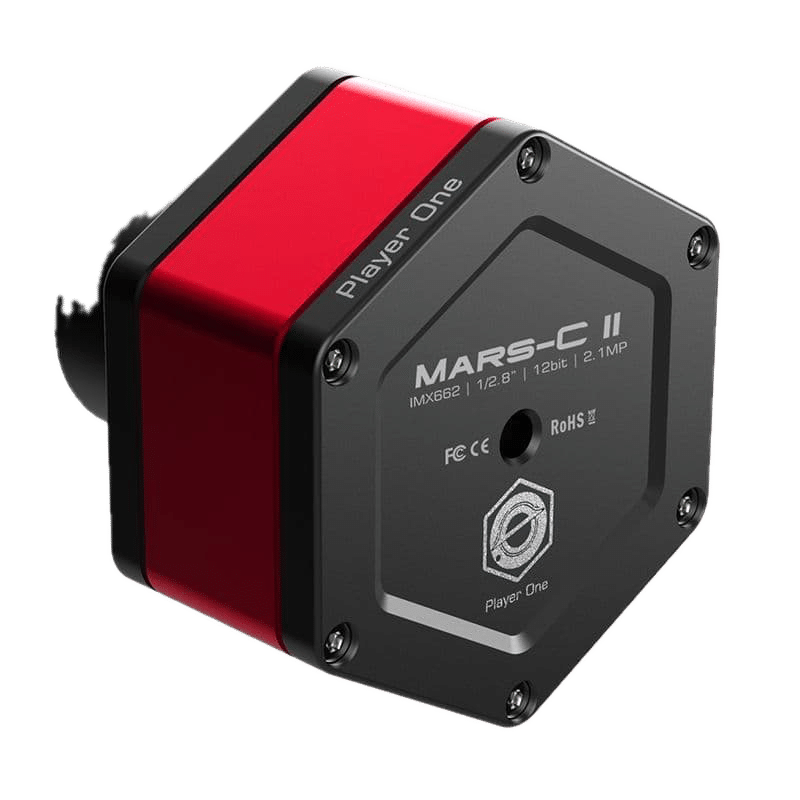
To get started with color planetary photography: the Player One Mars-C II is one of my easiest choices. Its 2.9 µm pixels are easy to pair with a decent Barlow lens, and it can capture up to 108 frames per second in RAW8 at full resolution.
For a planetary, lunar, and solar camera with a wider field of view: the Player One Neptune 664C It offers 4.2 megapixels, 2.9 µm pixels, and up to 93 frames per second in RAW10 at full resolution, or 136 frames per second in RAW8.
For planetary and solar photography in monochrome: the ToupTek G3M662M reaches approximately 100 frames per second at full resolution in 8-bit mode. To cover a larger area with very fine pixels, the ToupTek G3M678M offers 8.3 megapixels, 2 µm pixels, approximately 47 to 60 frames per second across the entire sensor, and over 100 frames per second with a reduced readout area.
For a specialized solar-powered camera: the Player One Apollo-M MAX Monochrome is designed to work with long focal lengths and achieves 126 frames per second. The Player One Apollo-C It can capture up to 164 frames per second and features a global shutter, which is particularly useful for photographing the Sun and the Moon.
The Five Criteria That Really Matter
Sensor size
A large sensor captures a wider portion of the sky. This is great for large nebulae, but it requires optics that are well-corrected all the way to the edges, a suitable corrector, and a rigid optical system. An APS-C sensor like the IMX571 works beautifully with a good refractor or a properly corrected Newtonian. An IMX585 sensor is smaller and frames the target more tightly, but it’s more forgiving of field defects. For beginners, a small, clean sensor can therefore yield better results than a large sensor that’s not used properly.
Pixel Size and Sampling
Sampling refers to the portion of the sky captured by a single pixel. It is calculated as follows: 206.265 multiplied by the pixel size in microns, then divided by the telescope’s focal length in millimeters. The result is expressed in arcseconds per pixel.
With 3.76 µm pixels and a focal length of 490 mm, you get about 1.58 arcseconds per pixel. This is a very good balance for a wide-field telescope. With the same pixels at a focal length of 1,000 mm, this drops to about 0.78 arcseconds per pixel. You potentially gain in resolution, but tracking, focusing, and dealing with atmospheric turbulence become much more challenging.
With 2.9 µm pixels at 490 mm, the resolution is approximately 1.22 arcseconds per pixel. At 1,000 mm, it drops to approximately 0.60 arcseconds per pixel. This is often too fine for an initial deep-sky setup, but it’s very useful for planetary photography, where you work with video and select the best frames.
For deep-sky photography, a value of about 1 to 2 arcseconds per pixel is generally sufficient. A finer resolution isn’t necessarily better: if the sky, tracking, or focusing don’t allow you to take full advantage of that resolution, you’ll mainly end up with larger files and a setup that’s harder to adjust.
Frames per second (FPS)
FPS are essential for planetary, lunar, and solar imaging. A high frame rate allows you to capture thousands of images during a short sequence. The software then retains the images captured during the moments of greatest atmospheric stability. The smaller the planet, the more useful a reduced reading area, called an ROI, becomes: the camera reads only a small portion of the sensor and can significantly increase its frame rate.
The advertised maximum frame rate often corresponds to 8-bit or RAW8 mode. In 10-, 12-, 14-, or 16-bit modes, the frame rate may decrease. The selected exposure must also be short enough to achieve this frame rate. If each image takes 20 milliseconds, the physical limit is 50 frames per second, even if the camera can theoretically go faster. USB transfer speed, the computer’s hard drive, and the size of the ROI also play a role.
In deep-sky astronomy, frames per second (FPS) is not a top priority when choosing equipment. Exposures last several seconds or several minutes. Cooling, noise, dynamic range, and sensor size are much more important.
Color or black-and-white
A color camera is the easiest option to start with. A single series of images produces color directly, and a multiband filter allows you to capture many nebulae even under a bright sky. A monochrome camera requires a filter wheel or filter drawer and longer exposure times, but each pixel receives the useful light directly. It is the highest-performance solution for LRGB, H-alpha, OIII, and SII filters, as well as for specialized solar imaging.
Cooling
For deep-sky photography, I recommend a cooled camera as soon as your budget allows. Cooling stabilizes the sensor temperature, reduces thermal noise, and makes it easier to create dark frame libraries. For planets and the Sun, exposure times are very short: cooling becomes much less important than frame rate, sensitivity, and sensor choice.
Comparison of Deep-Sky Cameras
ToupTek ATR585C: The Best Versatile Entry-Level Model
Visit ToupTek ATR585C It uses an 8.3-megapixel IMX585 color sensor with 2.9 µm pixels. It is cooled, has no annoying amp glow, and can reach approximately 47 frames per second at full resolution in 8-bit mode. I recommend it to anyone who wants to explore deep-sky objects without immediately investing in a large sensor. It can also be used for the Moon and planets, although an uncooled planetary camera will be lighter and often faster.
Its relatively small sensor makes it easier to choose filters and reduces the demands placed on the field corrector. It is very well suited for small galaxies, planetary nebulae, and details within large nebulae. For very large targets, you will need to create a mosaic or use a short focal length.
ZWO ASI585MC Pro: The Same Approach Across the ZWO Ecosystem
Visit ZWO ASI585MC Pro It also uses the IMX585 color sensor, with 8.29 megapixels and 2.9 µm pixels. It can capture up to 47 frames per second at full resolution and features a two-stage cooling system. I recommend it if you want to use a ZWO ASIAIR Plus and build a fully integrated ecosystem centered on the brand.
When comparing the ATR585C and the ASI585MC Pro, image quality depends less on the brand name and more on temperature, gain settings, optics, and image processing. The practical choice mainly comes down to which software, connectivity options, accessories, and ecosystem you prefer.
ZWO ASI533MC Pro: The Reliable Choice for a Serious Start in Astronomy
Visit ZWO ASI533MC Pro It features a 9-megapixel IMX533 square sensor with 3.76 µm pixels. Its square format is ideal for nebulae, star clusters, and many galaxies. It offers a wider field of view than the IMX585, 14-bit conversion, and cooling optimized for long exposures.
I recommend it to users who want a camera that’s easy to use, with a clean sensor and a field of view that’s already comfortable, without having to switch to APS-C right away. Its 20 frames per second at full resolution are sufficient for focusing and certain fast-paced applications, but this isn’t a camera primarily designed for planetary photography.
IMX571 Cameras: The Real Leap Toward APS-C
Visit ToupTek ATR2600Cthe Player One Poseidon-C Pro and the ZWO ASI2600MC Pro They share the same large 26-megapixel APS-C sensor with 3.76 µm pixels. They offer a wide field of view, a wide dynamic range, and files with sufficient detail to produce large prints.
The ToupTek ATR2600C offers an excellent balance of performance and price, featuring a 16-bit converter, a 512 MB buffer, and a tilt adjustment plate. The Player One Poseidon-C Pro is particularly appealing for its mechanics, tilt control, and large well capacity. The ZWO ASI2600MC Pro is a logical choice if you already use ASIAIR, a ZWO mount, or ZWO accessories.
Visit ZWO ASI2600MC Duo Adds a guide sensor in the same housing. This is an excellent way to simplify the optical train and wiring. You just need to verify that the sensor’s field of view contains enough stars given your focal length and filters. For very narrow-band filters or demanding focal lengths, a separate optical splitter may still be preferable.
When should you switch to monochrome?
If your goal is to produce highly detailed images in SHO mode or to work effectively under urban skies, you might want to check out the ZWO ASI2600MM Prothe ZWO ASI2600MM Duothe Player One Poseidon-M Pro or the ToupTek ATR2600M. The potential output is higher, but the total investment also includes filters, the filter wheel or filter drawer, and longer processing time.
Comparison of Planetary Cameras
Player One Mars-C II: Simple, Fast, and Effective
Visit Player One Mars-C II is my simplest recommendation for photographing Jupiter, Saturn, and Mars in color. Its 2.1-megapixel IMX662 sensor has 2.9 µm pixels. It can capture 108 frames per second at full resolution in RAW8, which allows you to record several thousand images in less than a minute.
With 2.9 µm pixels, a focal ratio of around f/14 to f/15 is a good starting point for visible light when conditions are favorable. An f/5 telescope can therefore use a Barlow lens with a magnification of around 3x. An f/10 Schmidt-Cassegrain, on the other hand, will require more moderate magnification. Actual atmospheric turbulence should always be the deciding factor.
Player One Neptune 664C: Wider Coverage and Still Plenty of Speed
Visit Player One Neptune 664C It uses a 4.2-megapixel IMX664 sensor with the same 2.9 µm pixels. It achieves 93 frames per second in RAW10 across the entire sensor and up to 136 frames per second in RAW8. Its wider field of view makes it easier to frame the Moon and the Sun and provides more freedom for creating mosaics.
I would choose this one over the Mars-C II if you want a more versatile planetary camera for large objects, without sacrificing frame rate. For a small planet centered within a ROI, both can operate very quickly.
Player One Saturn-C SQR: The Large Square Sensor
Visit Player One Saturn-C SQR It uses a 9-megapixel IMX533 square sensor, with 3.76 µm pixels and a frame rate of 43 frames per second in RAW8 at full resolution. It is slower than the Mars-C II, but its 16-mm diagonal sensor covers a significantly larger area.
I recommend it especially for the Moon, the Sun, and mosaics. With 3.76 µm pixels, a focal ratio close to f/18 to f/19 is a good starting point for high-resolution imaging. For Jupiter or Saturn, using a region of interest (ROI) helps reduce the amount of data recorded.
ToupTek G3M662M: A Fast, Affordable Monochrome Printer
Visit ToupTek G3M662M It uses a 2.1-megapixel monochrome IMX662 sensor with 2.9 µm pixels. It achieves approximately 100 frames per second at full resolution in 8-bit mode and operates even faster with an ROI. The monochrome sensor improves efficiency with dedicated red, infrared, methane, or solar filters.
This is a very interesting camera if you’re willing to use filters and, if necessary, produce color by taking multiple exposures. It can also be used for guidance. For a beginner who wants a color image right away, the Mars-C II is still the more straightforward option.
ToupTek G3M678M: High Pixel Count and Very Fine Sampling
Visit ToupTek G3M678M features an 8.3-megapixel 4K monochrome sensor with pixels measuring just 2 µm. It achieves approximately 47 to 60 frames per second across the entire sensor and exceeds 100 frames per second with a typical ROI.
Its 2 µm pixels already achieve a respectable planetary resolution at around f/10. This sometimes eliminates the need for a very high-magnification Barlow lens. This is a real advantage with instruments that already have a long focal length or when atmospheric turbulence prevents further magnification. Its high pixel count is also useful for lunar and solar mosaics.
ZWO ASI585MC Pro: The Camera That Can Do Just About Anything
Visit ZWO ASI585MC Pro It reaches 47 frames per second at full resolution. While it doesn’t match the Mars-C II or the Neptune 664C in terms of maximum speed, its cooling system also allows it to capture truly long exposures of the deep sky. It’s a good option if you’d rather buy just one camera to start with and are willing to make a reasonable compromise.
Visit ZWO ASI585MM Pro applies this principle in monochrome. It is particularly useful for deep-sky photography with filters, the Moon, and the Sun, but it requires more comprehensive filter management.
What focal ratio should you choose for a planetary lens?
A rule of thumb is to aim for a focal ratio of about five times the pixel size in microns for planetary imaging in visible light. This isn't a hard-and-fast rule, but it's an excellent starting point.
With 2 µm pixels, start around f/10. With 2.9 µm pixels, start around f/14 to f/15. With 3.76 µm pixels, start around f/18 to f/19. With 5.86 µm pixels, start around f/29. The observed wavelength, the telescope’s aperture, and especially atmospheric turbulence may warrant using a shorter focal ratio.
It’s better to get an image that’s slightly less magnified but bright and fast than a huge image that requires high gain and excessively long exposure times. In planetary photography, the frame rate and sharpness of each image often matter more than spectacular magnification on the screen.
The Best Cameras for Photographing the Sun
Important Notice: A camera does not protect your eyes or your equipment. Never point a telescope at the Sun without a certified and properly installed solar viewing system. Depending on the instrument, you’ll need an aperture filter, a compatible Herschel prism, or a dedicated solar telescope with its blocking filter. A simple photographic filter screwed onto the camera is not sufficient.
Player One Apollo-M MAX: The Monochrome Specialist
Visit Player One Apollo-M MAX It uses large 9-µm pixels and achieves a frame rate of 126 frames per second. It is particularly well-suited for solar systems using long focal lengths, ranging from around f/30 to f/35 depending on the setup. Its large pixels collect a lot of signal, which is valuable when using a very narrow H-alpha filter.
Player One Apollo-C: High Speed and Global Shutter
Visit Player One Apollo-C uses an IMX174 color sensor with 5.86 µm pixels, a global shutter, and a frame rate of up to 164 frames per second. The global shutter reads all pixels at the same time, which reduces distortion associated with line-by-line reading.
The color version is easy to use, but for a very narrow H-alpha system, a monochrome camera generally makes better use of the available light. The Apollo-C remains particularly well-suited for white light, the Moon, and very fast exposures.
ToupTek G3M678M and G3M662M: Two Compact Solar Options
Visit ToupTek G3M678M is ideal if you want to capture a large area of the Sun with high definition. The ToupTek G3M662M has fewer pixels, but reaches about 100 frames per second at full resolution and produces smaller files. The best choice therefore depends on the solar field you want to cover and the power of your computer.
ZWO ASI585MM Pro: Solar, Lunar, and Deep Sky
Visit ZWO ASI585MM Pro is a versatile solution for users who want to photograph the Sun in black and white and then use the same camera to capture nebulae and galaxies. Its large 4K sensor makes creating mosaics easier. For solar photography focused exclusively on maximum frame rate, an Apollo or a small, dedicated planetary camera remains a more specialized option.
Equipment You'll Need for Your Camera Setup
The Right Approach
For a first deep-sky setup, a field-corrected telescope such as the’Askar 71F is very easy to use. With a focal length of nearly 490 mm and a camera with 3.76 µm pixels, the resolution is approximately 1.58 arcseconds per pixel. This makes for a well-balanced setup for nebulae, clusters, and large galaxies.
A filter tailored to your sky
With a color camera and emission nebulae, a dual-band filter such as the’Antlia ALP-T 5 nm H-alpha and OIII significantly increases contrast under a light-polluted sky. This type of filter is not a one-size-fits-all solution: it works excellently for emission nebulae, but it is not the right choice for galaxies, clusters, or reflection nebulae.
Guidance
For long exposures, you can use a small guide scope or an optical splitter. I generally prefer the optical splitter, because the guide camera observes through the same instrument as the main camera. The ToupTek OAG-X is a compact solution. For guidance, a high-sensitivity monochrome camera such as the ToupTek IMX290 Mono can do the job perfectly well.
If you're looking for maximum simplicity within the ZWO ecosystem, the ZWO ASI2600MC Duo or the ZWO ASI2600MM Duo avoids the need to buy a separate guide camera.
Controlling the Setup
Visit ToupTek StellaVita is useful if you want to use different camera brands and keep an open setup. The ZWO ASIAIR Plus offers a very smooth experience with ZWO main cameras, compatible mounts, and ZWO accessories. Therefore, the choice of an onboard computer should be made at the same time as the choice of a camera, not afterward.
The Mount and Focusing
A good camera can't make up for inconsistent tracking. For a modern mobile setup, the ZWO AM5N offers ample load capacity in a sleek, compact design. For a lighter setup, the ZWO AM3N is very interesting. A focusing motor like the ZWO EAF or the ToupTek AAF automatically refocuses when the temperature changes.
Three simple setups I recommend
Accessible color setup for deep-sky imaging
I'd start with the’Askar 71Fthe ToupTek ATR585Cthe ToupTek StellaVita and a simple guidance system. It’s compact, well-designed, and powerful enough to seriously learn data acquisition and processing.
High-Quality APS-C Color Setup
I would choose an IMX571 camera: ToupTek ATR2600C, Player One Poseidon-C Pro or ZWO ASI2600MC Pro. I would add a filter suitable for the targets, an optical splitter for guidance, motorized focusing, and a mount designed with a comfortable margin.
Simple Setup for Jupiter, Saturn, and Mars
I'd start with the Player One Mars-C II, a Barlow lens chosen to achieve an approximate f/15 ratio, and—if the planet remains low on the horizon—an atmospheric dispersion corrector. This setup allows you to focus on collimation, focusing, and image processing without immediately adding a filter wheel.
Frequently Asked Questions About Astrophotography Cameras
Which camera should you choose if you're just starting out in astrophotography?
For deep-sky photography, I recommend a cooled color camera such as the ToupTek ATR585C, the ZWO ASI585MC Pro, or the ZWO ASI533MC Pro. For planetary photography, the Player One Mars-C II is simpler, less expensive, and faster. No single camera can be the best choice for every application.
Does a higher megapixel count mean a better camera?
No. Megapixels primarily determine the file resolution and, along with the sensor size, the field of view. The final image quality also depends on sampling, noise, dynamic range, cooling, optics, tracking, and turbulence.
How many FPS do you need for the planets?
An actual frame rate of 60 to 100 frames per second is already excellent for many situations. Frame rates of 100 to 160 frames per second are useful for bright targets, with a very short exposure time and a region of interest (ROI). A camera advertised as capable of 150 FPS will not actually reach that rate if the exposure, readout mode, or computer limits the frame rate.
Do you need a monochrome camera for solar applications?
For a narrow-band solar filter such as H-alpha or Ca-K, a monochrome camera is generally the best choice, since each pixel receives the desired signal. A color camera is simpler and can be very effective in white light, moonlight, and for general-purpose use.
How can you tell if the sampling is correct?
Calculate 206.265 multiplied by the pixel size, then divide by the focal length. For deep-sky imaging, a value close to 1 to 2 arcseconds per pixel is a good starting point. For planetary imaging, use the rule of thumb that the focal ratio is approximately five times the pixel size in microns, then adjust according to turbulence.
Is a cooled camera required?
It is not required for planets, the Moon, or the Sun. However, it is strongly recommended for deep-sky photography, since long exposures produce more thermal noise and benefit from a stable temperature.
Do ToupTek, Player One, and ZWO produce very different images with the same sensor?
With an identical sensor and the right settings, the differences in raw image data may be smaller than one might imagine. The mechanics, cooling, buffer memory, connectivity, tilt adjustment, drivers, and software ecosystem then become the deciding factors. You need to choose the entire system, not just the sensor’s name.
What's the best all-around camera?
A cooled IMX585 camera, such as the ToupTek ATR585C or the ZWO ASI585MC Pro, offers the most reasonable balance between deep-sky, lunar, and planetary photography. However, it will not be as fast as a Mars-C II on Jupiter, nor as wide-angle as an APS-C camera on large nebulae. If your project is clearly defined, a specialized camera will yield better results.
My final piece of advice
Don't choose a camera just because it has the largest sensor or the highest frame rate. Start by considering your telescope, its focal length, its aperture ratio, and the objects you want to photograph. Next, check the resolution and field of view, then choose the control system.
For color deep-sky photography, the IMX585 is the smart entry point, and the IMX571 is the big leap toward a long-term setup. For planetary imaging, the 2.9 µm pixels and a frame rate of nearly 100 frames per second strike an excellent balance. For solar imaging, opt for a monochrome sensor, one suited to your field of view, and, most importantly, a certified solar filter system.
If you're deciding between two models, the best approach is to start with your telescope, its focal length, and your primary target. You can contact me with these three pieces of information so we can check the field of view, resolution, focal ratio, and necessary accessories before you make a purchase.