01Collimation, and why it changes everything
Visit collimation refers to the precise alignment of your telescope's optical elements. When the optics are perfectly coaxial, the light converges on a sharp point and the image reaches its full potential in terms of sharpness and contrast. As soon as this alignment is disturbed, even slightly, the stars lose their symmetry, planetary details become blurred and resolution drops.
On a Schmidt-Cassegrain (like the Celestron NexStar Evolution range), alignment is factory-set once the instrument is fully assembled. The only truly adjustable element, and the one that can move with handling, is the the inclination of the secondary mirror. It is on this mirror, and on it alone, that the collimation of a Schmidt-Cassegrain is played out.
The good news is that adjustment requires no exotic tools, is entirely reversible, and quickly becomes a routine that takes just a few minutes. Bad news for your images if you don't know: a decollimated instrument will never give the sharpness for which it was designed, no matter how good its optics.
02Is it really necessary to collimate your Schmidt-Cassegrain?
Unlike a Newton, which often needs to be checked at every output, a Schmidt-Cassegrain holds its collimation remarkably well. The tube is closed, the secondary mirror is securely held, and the factory alignment can be maintained for a long time. So there's no need to touch the screws if all goes well.
In practice, check collimation in these situations:
- After a rough ride, a long car journey or a plane trip.
- When you receive a new or used instrument, to get off to a sound start.
- When the stars seem soft, comma-shaped or comet-like, even in focus.
- Before a high-resolution imaging session (lunar, planetary or solar), where the slightest error can be seen.
The rest of the time, an occasional check is sufficient. If the star test described below is satisfactory, don't adjust anything: the best intervention is often the one you don't do.
03What you need
It all fits in a pocket. Here's what you need to gather before heading out under the stars.
- Phillips screwdriverSmall size. Screw type may vary by model: check your instructions.
- A shining starClose to the zenith, or the Pole Star, which moves very little in the sky.
- A medium-to-high-power eyepieceTo enlarge the image sufficiently and judge its symmetry finely.
- Patience and stable skiesAtmospheric turbulence makes adjustment difficult: opt for a calm night.
A artificial star or a laser collimator dedicated to Schmidt-Cassegrain can simplify handling, but the test on a real star remains the absolute reference, as it judges the lens in its real-life conditions of use.
04Prepare the telescope before you start
Good collimation always starts with good preparation. Two points are essential.
Let the telescope warm up
A tube that is hotter than the ambient air generates internal convection currents that distort the image and completely distort judgment. Take out your instrument ahead of time and tune it for approximately 45 minutes to achieve thermal equilibrium, even more so if the temperature difference between inside and outside is significant. As long as the image is «boiling», there's no need to touch the screws.
Choose the right star
Aim for a bright star near the zenith This is where the layer of atmosphere through which the star passes is the thinnest, and therefore the most stable. Activate mount tracking to keep the star centered without intervention. If you prefer not to switch on the telescope, the’North Star is an excellent alternative: close to the celestial pole, it moves so little that manual tracking becomes unnecessary.
Set up your medium-to-high power eyepiece, then carefully center the star: good centering is essential to correctly assess collimation.
05Read the diffraction pattern (the star test)
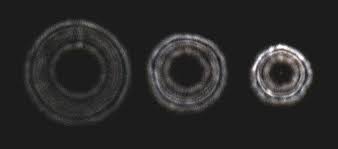
Diagnosis is based entirely on the observation of a star slightly defocused. By gently turning the focus, the star is transformed into a disc with concentric rings, with a central dark spot which corresponds to the shadow of the secondary mirror.
Everything depends on the symmetry of this figure:
Proceed as follows: defocus on either side of the focus point (a little before, then a little after the focus point) and observe. If the dark spot remains well centered and concentric rings, your instrument is collimated. If the shadow is still moving in the same direction, move on to adjustment.
06Adjust secondary mirror screws, step by step
Adjustment involves tilting the secondary mirror very slightly using the collimation screw located on the support at the front of the tube. The golden rule can be summed up in one sentence: small gestures, with the star refocused between each one.
Only use very small adjustments, Then recenter the star with the racket before judging the result and continuing. A complete turn of one stroke can totally unbalance the instrument.
-
Defocus and find the offset
On a bright, well-centered star, defocus until you see the rings and the central dark spot. Note precisely in which direction this shadow is shifted.
-
Create a finger shadow
Bring a finger close to the edge of the front cell, without ever touching the corrector blade, pointing towards the screws. Its shadow becomes visible in the eyepiece. Move the finger along the edge until its shadow points towards the area where the rings are tightest, i.e. on the same side as the offset.
-
Identify the first screw
Locate the collimation screw closest to your finger: this is the one you'll adjust first. If your finger falls exactly between two screws, adjust the opposite screw.
-
Shift the star towards the edge
Using the racket, bring the defocused image of the star to the edge of the field, in the direction where the central shadow is offset.
-
Turn slowly, observing
While looking through the eyepiece, turn the marked screw about a tenth of a turn with the screwdriver. If the star comes out of the field in the direction of the offset, you're turning in the wrong direction: reverse, so as to bring the star back towards the center.
-
Keep screws under tension
If one screw becomes loose when turned, tighten the other two by the same amount. Conversely, if one screw forces too much, loosen the other two by the same amount. The mirror should be held firmly in place, but not excessively.
-
Check and repeat if necessary
Once the star is recentered, check that the rings are concentric. If the shadow remains shifted in the same direction, continue with the same screw. If the shift has moved in another direction, simply repeat steps 2 to 6 for the new direction.
Never place your finger or screwdriver on the glass corrective blade on the front of the tube: fingerprints or scratches would be permanent. Handle only the metal rim and screw heads.
07What successful collimation looks like
Perfect collimation can be recognized by image of a highly symmetrical star, identical just before and just after focus, with a central spot perfectly in the middle of the rings. When in focus, the star shows a sharp spot surrounded by a thin ring of diffraction: a sign that the optics are delivering their full potential.
One final factor conditions everything: the atmospheric turbulence (seeing). If the air is unstable and the image flickers and bubbles, it becomes impossible to judge correctly. In this case, wait for a calmer night or aim for a more stable part of the sky, where the stars look still rather than flickering.
08Common mistakes and professional advice
- Set to cold without warming up. Until the tube is at equilibrium, air currents distort everything. Please wait.
- Turn too hard. The beginner's reflex. Stay on fractions of a turn and refocus after each gesture.
- Offset the star. A figure judged to be out of the center of the field lies: always keep the star well centered to evaluate.
- Wanting to collimate by bad seeing. A turbulent night is a lost cause for this setting. Choose your evenings.
- Confusing tools. A Bahtinov mask is used for focusing, not collimation: here, it's the diffraction rings that guide you.
- Forget to double-check on the evening of imaging. For high resolution, check collimation once the instrument has reached temperature, on site.
09Frequently asked questions
How often should you collimate a Schmidt-Cassegrain?
Much less often than a Newton. The closed tube retains its alignment well. A check after each major transport and an occasional check are sufficient in most cases. If the star test is good, don't touch anything.
Can you collimate your telescope in broad daylight?
The reference method is performed at night, on a defocused star. During the day, an artificial star placed at a good distance can be used as a back-up, but the test on a real star, which loads the optics under real conditions, remains the final judge.
Which star to choose for the setting?
A bright star close to the zenith, where the atmosphere is most stable, with mount tracking activated. The Pole Star is an excellent alternative: it moves so little that no manual tracking is required.
Can turning the screws damage the telescope?
No, as long as you stick to small adjustments and never force or leave a screw completely free. The adjustment is entirely reversible. The only real danger is touching the glass corrective blade: keep fingers and tools away from metal parts.
Do I need a laser collimator for a Schmidt-Cassegrain?
It's not essential. The free, precise star test is perfectly sufficient. Dedicated accessories are available for greater comfort and speed, but they do not replace the final verification on the sky.
Why do my stars remain out of focus even after collimation?
Before questioning the alignment, check three things: the temperature of the tube, the quality of the seeing that night, and the focus. A bubbling image often reflects atmospheric turbulence, not a collimation fault.
Need a hand or an accessory?
This procedure follows the official method for Schmidt-Cassegrain telescopes in the Celestron NexStar Evolution range. For personalized advice, the choice of a suitable eyepiece or a collimation tool, the Deep Space Astronomy team is at your disposal.